Page 29 - CanaDream 2025 TCA English
P. 29
OPERATING SYSTEMS IN THE RV
CHECKING BATTERY CONDITION TIP
When there are power problems of any kind, try resetting
The lights on the monitor panel will indicate the approximate all the RV breakers by turning them all the way OFF then back
condition of the camper battery. ON again. If a fuse needs to be replaced, ensure to replace the
fuse with the correct amperage number (or colour).
Monitor Panel 1:
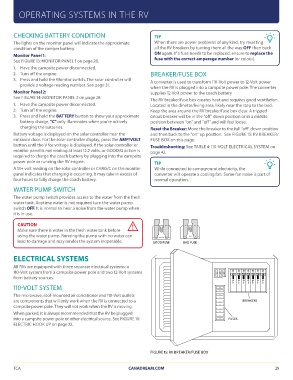
See FIGURE 13: MONITOR PANEL 1 on page 28. BREAKER/FUSE BOX
1. Have the campsite power disconnected. A converter is used to transform 110-Volt power to 12-Volt power
2. Turn off the engine. when the RV is plugged into a campsite power pole. The converter
3. Press and hold the Monitor switch. The solar controller will supplies 12-Volt power to the coach battery
provide a voltage reading number. See page 31. The RV breaker/fuse box creates heat and requires good ventilation.
Located in the dinette/living area, likely near the step to the bed.
Monitor Panel 2: Keep the area around the RV breaker/fuse box clear. A tripped
See FIGURE 14: MONITOR PANEL 2 on page 28. circuit breaker will be in the “off” down position or in a middle
position between “on” and “off” and will feel loose.
1. Have the campsite power disconnected. Reset the Breaker: Move the breaker to the full “off” down position
2. Turn off the engine. and then back to the “on” up position. See FIGURE 15: RV BREAKER/
3. Press and hold the BATTERY button to show your approximate FUSE BOX on this page.
Troubleshooting: See TABLE 4: 110-VOLT ELECTRICAL SYSTEM on
battery charge. "C" only illuminates when you’re actively page 42.
charging the batteries.
TIP
Battery voltage is displayed on the solar controller near the While connected to campground electricity, the
entrance door. For the solar controller display, press the AMP/VOLT converter will operate a cooling fan. Some fan noise is part of
button until the V for voltage is displayed. If the solar controller or normal operation.
monitor panel is not reading at least 12.2 volts, or GOOD/G action is
required to charge the coach battery by plugging into the campsite GOOD FUSE BAD FUSE
power pole or running the RV engine.
A 13+ volt reading on the solar controller or CHRG/C on the monitor
panel indicates that charging is occurring. It may take in excess of
four hours to fully charge the coach battery.
WATER PUMP SWITCH
The water pump switch provides access to the water from the fresh
water tank. Anytime water is not required turn the water pump
switch OFF. It is normal to hear a noise from the water pump when
it is in use.
CAUTION
Make sure there is water in the fresh water tank before
using the water pump. Running the pump with no water can
lead to damage and may render the system inoperable.
ELECTRICAL SYSTEMS – 25 – ON ON ON ON ON ON ON
– 25 – 30 15 15 15 15 15 20
All RVs are equipped with three separate electrical systems: a – 25 – OFF OFF OFF OFF OFF OFF OFF
110-Volt system from a campsite power pole and two 12-Volt systems
from battery sources. – 20 – BREAKERS
– 15 –
110-VOLT SYSTEM – 15 – FUSES
– 15 –
The microwave, roof-mounted air conditioner and 110-Volt outlets – 15 –
are components that will only work when the RV is connected to a – 15 –
campsite power pole. They will not work when the RV is moving. – 15 –
– 15 –
When parked, it is always recommended that the RV be plugged – 15 –
into a campsite power pole or other electrical source. See FIGURE 10: – 15 –
ELECTRIC HOOK UP on page 22.
FIGURE 15: RV BREAKER/FUSE BOX
TCA CANADREAM.COM 29
CHECKING BATTERY CONDITION TIP
When there are power problems of any kind, try resetting
The lights on the monitor panel will indicate the approximate all the RV breakers by turning them all the way OFF then back
condition of the camper battery. ON again. If a fuse needs to be replaced, ensure to replace the
fuse with the correct amperage number (or colour).
Monitor Panel 1:
See FIGURE 13: MONITOR PANEL 1 on page 28. BREAKER/FUSE BOX
1. Have the campsite power disconnected. A converter is used to transform 110-Volt power to 12-Volt power
2. Turn off the engine. when the RV is plugged into a campsite power pole. The converter
3. Press and hold the Monitor switch. The solar controller will supplies 12-Volt power to the coach battery
provide a voltage reading number. See page 31. The RV breaker/fuse box creates heat and requires good ventilation.
Located in the dinette/living area, likely near the step to the bed.
Monitor Panel 2: Keep the area around the RV breaker/fuse box clear. A tripped
See FIGURE 14: MONITOR PANEL 2 on page 28. circuit breaker will be in the “off” down position or in a middle
position between “on” and “off” and will feel loose.
1. Have the campsite power disconnected. Reset the Breaker: Move the breaker to the full “off” down position
2. Turn off the engine. and then back to the “on” up position. See FIGURE 15: RV BREAKER/
3. Press and hold the BATTERY button to show your approximate FUSE BOX on this page.
Troubleshooting: See TABLE 4: 110-VOLT ELECTRICAL SYSTEM on
battery charge. "C" only illuminates when you’re actively page 42.
charging the batteries.
TIP
Battery voltage is displayed on the solar controller near the While connected to campground electricity, the
entrance door. For the solar controller display, press the AMP/VOLT converter will operate a cooling fan. Some fan noise is part of
button until the V for voltage is displayed. If the solar controller or normal operation.
monitor panel is not reading at least 12.2 volts, or GOOD/G action is
required to charge the coach battery by plugging into the campsite GOOD FUSE BAD FUSE
power pole or running the RV engine.
A 13+ volt reading on the solar controller or CHRG/C on the monitor
panel indicates that charging is occurring. It may take in excess of
four hours to fully charge the coach battery.
WATER PUMP SWITCH
The water pump switch provides access to the water from the fresh
water tank. Anytime water is not required turn the water pump
switch OFF. It is normal to hear a noise from the water pump when
it is in use.
CAUTION
Make sure there is water in the fresh water tank before
using the water pump. Running the pump with no water can
lead to damage and may render the system inoperable.
ELECTRICAL SYSTEMS – 25 – ON ON ON ON ON ON ON
– 25 – 30 15 15 15 15 15 20
All RVs are equipped with three separate electrical systems: a – 25 – OFF OFF OFF OFF OFF OFF OFF
110-Volt system from a campsite power pole and two 12-Volt systems
from battery sources. – 20 – BREAKERS
– 15 –
110-VOLT SYSTEM – 15 – FUSES
– 15 –
The microwave, roof-mounted air conditioner and 110-Volt outlets – 15 –
are components that will only work when the RV is connected to a – 15 –
campsite power pole. They will not work when the RV is moving. – 15 –
– 15 –
When parked, it is always recommended that the RV be plugged – 15 –
into a campsite power pole or other electrical source. See FIGURE 10: – 15 –
ELECTRIC HOOK UP on page 22.
FIGURE 15: RV BREAKER/FUSE BOX
TCA CANADREAM.COM 29